Follow Me On Social Media!
No-Knead Dinner Rolls: The Best Honey Butter Delight
Introduction to No-Knead Dinner Rolls with Honey Butter
Imagine walking into a warm kitchen filled with the irresistible aroma of freshly baked No-Knead Dinner Rolls. These rolls don’t just look good; they taste heavenly, soft, and buttery with a touch of sweetness that transports you straight to comfort food heaven. The best part? There’s no messy kneading involved, making them perfect for busy weeknights or special gatherings.
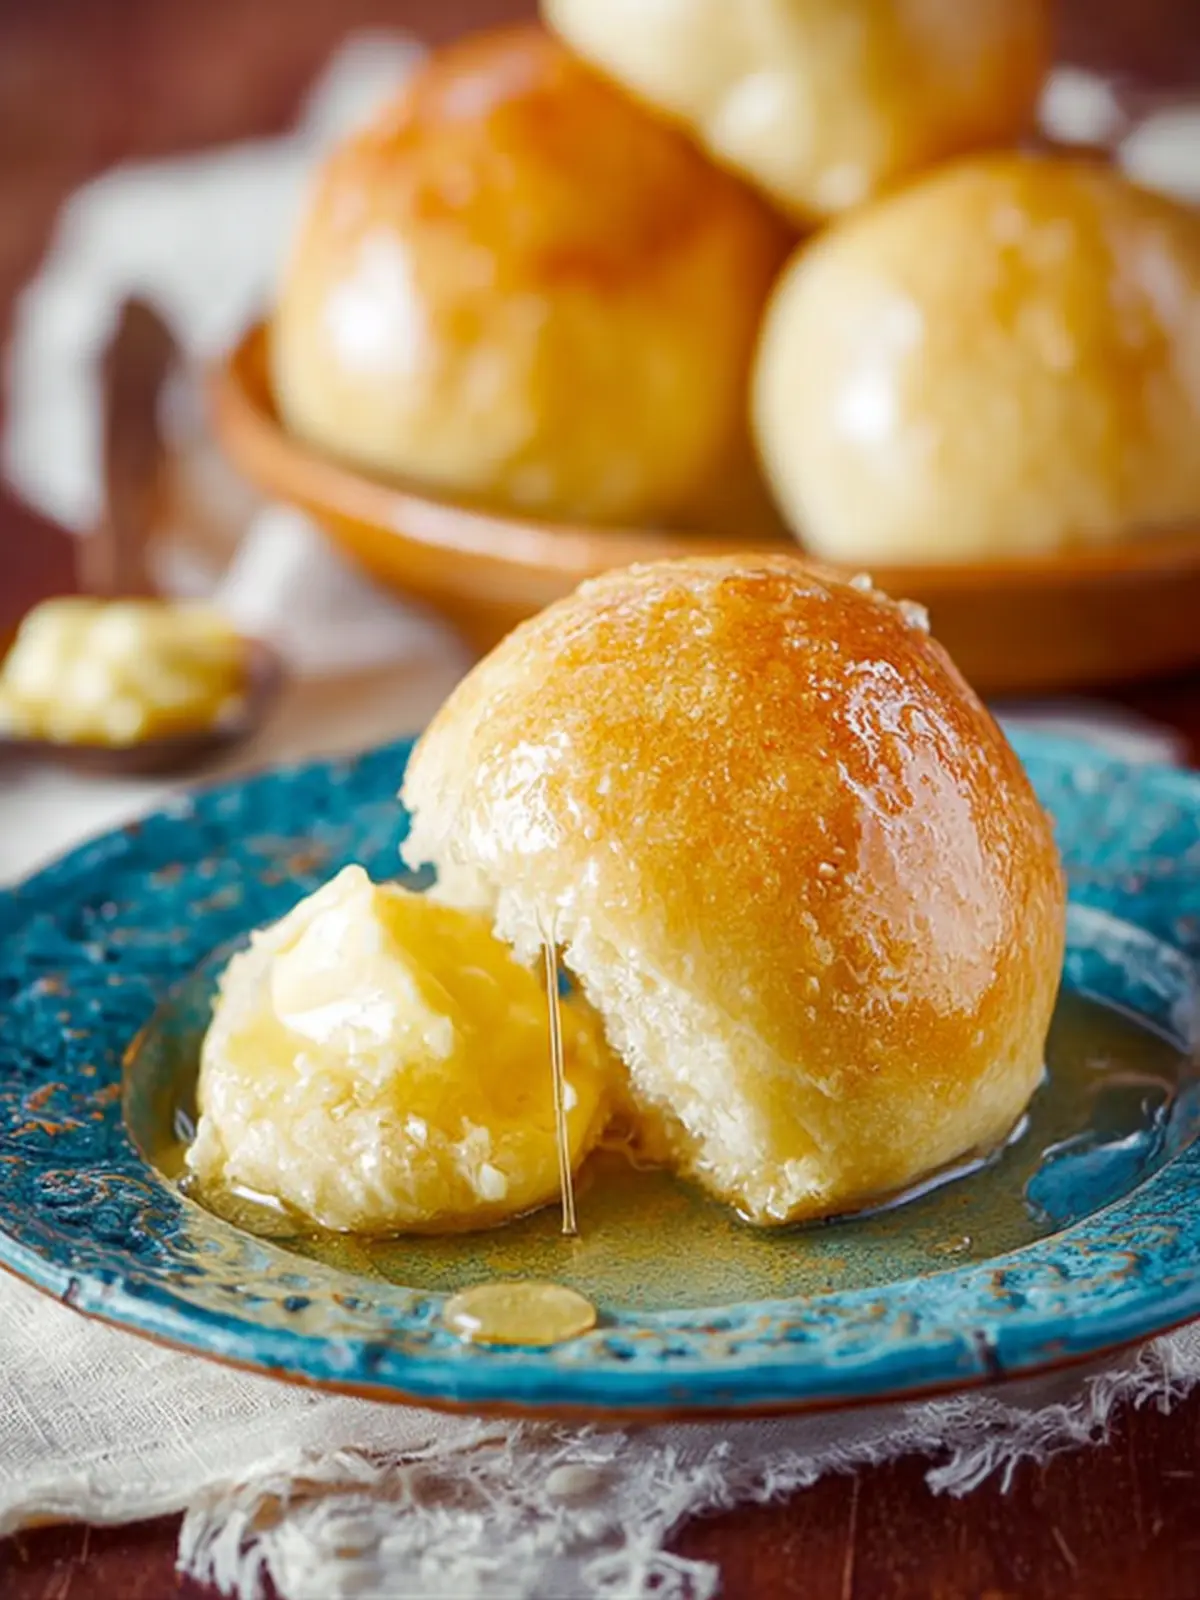
These No-Knead Dinner Rolls are a delightful blend of simplicity and flavor, offering a homemade touch without demanding too much of your time or effort. Picture buttery, golden-brown rolls that pull apart easily, revealing a pillowy interior that melts in your mouth. They’re perfect as a side to your favorite meal or simply enjoyed on their own, slathered with rich honey butter.
As we dive into this recipe, let’s embrace the joy of baking without the extra work. You’ll be astonished at how something so heavenly can come from such a straightforward process—the dough requires just a few minutes of hands-on time, followed by a leisurely rise. While you sip your coffee or catch up on your favorite show, the dough is working its magic, turning into those dreamy rolls you’ve been craving.
This recipe also offers a chance to indulge in homemade honey butter—a sweet and creamy companion that elevates each roll, making the experience even more special. Sweet, creamy, and utterly indulgent, honey butter brings a touch of luxury to the table.
Whether you’re new to baking or a seasoned pro, these No-Knead Dinner Rolls with Honey Butter promise to be a showstopper at any meal. Your friends and family will love them, and you’ll bask in the compliments—all while knowing you hardly broke a sweat in the kitchen.
What Makes These Rolls Irresistible?
- Textural Perfection: The rolls have a crispy exterior and incredibly soft inside.
- Flavorful Pairing: The honey butter adds a delightful sweetness that complements the rolls perfectly.
- Effortless Process: No kneading means less mess and more time to relax.
Get ready to bring the joy of freshly baked bread to your table—with minimal effort and maximum flavor!

Key Ingredients for No-Knead Dinner Rolls with Honey Butter
Water: The secret to achieving those fluffy No-Knead Dinner Rolls lies in using warm water. This simple yet essential ingredient activates the yeast, setting a robust foundation for a light and airy texture in every bite.
Yeast: I have a favorite—Red Star Platinum yeast. This yeast is reliable and works like a charm, ensuring perfectly risen rolls even on a busy weeknight.
Eggs: Adding eggs to the dough isn’t just a formality; they infuse richness and moisture, helping the rolls rise beautifully while contributing to a delicate crumb.
Oil: By choosing canola or vegetable oil, you keep the rolls tender and moist. This element is crucial for that soft texture that everyone loves.
Honey: A swirl of honey in the dough and melted butter glaze introduces a delightful sweetness that elevates the flavor profile, making every roll feel special.
Flour: All-purpose flour is my go-to as it strikes the perfect balance for structure. Its versatility allows the rolls to turn out beautifully every time.
Salt: It’s more than just seasoning; salt enhances the overall taste. Feel free to adjust the amount based on your preference—you might even find less is more!
Why You’ll Love These No-Knead Dinner Rolls
When you think of a comforting meal, nothing quite compares to the soft and warm goodness of no-knead dinner rolls. These delightful bites are perfect companions for any meal, whether it’s a casual weeknight dinner or a festive holiday gathering. Imagine breaking open a freshly baked roll, steam curling up, and a little warmth hugging your fingers. What’s not to love about that?
Perfect for Every Occasion
These no-knead dinner rolls aren’t just super easy to make; they’re also incredibly versatile. You can serve them alongside your favorite soups and stews, or use them to soak up delicious sauces. Hosting a dinner party? These rolls will impress your guests and fill their bellies. Feeling cozy on a Sunday? They make a great addition to a family meal.
- Easy Preparation: Forget about the hassle of kneading dough. All you need is a little mixing and some patience as they rise.
- Customizable: Want to add herbs, garlic, or cheese? Go ahead! The basic recipe is a blank canvas for your creativity.
- Crowd-Pleaser: Who can resist warm, buttery rolls? It’s almost guaranteed that everyone will be reaching for seconds.
Once you try these no-knead dinner rolls, they’re sure to become a staple in your recipe rotation.

Tips for Making Perfect No-Knead Dinner Rolls
Mastering the proofing process
Achieving fluffy and airy no-knead dinner rolls starts with proper proofing. It’s all about patience! Allow your dough to rise in a warm, draft-free area. For best results, let it rest for at least 8 to 12 hours. This long fermentation develops robust flavors and ensures a better texture. If you’re short on time, a 2- to 4-hour rise at a warmer temperature can work, but plan for a slower and longer rise whenever possible.
Avoiding common pitfalls
Even a seasoned baker can encounter hurdles when making these delightful rolls. To ensure success, measure your ingredients accurately using a kitchen scale. An excess of flour can lead to dry rolls, while too little can affect the dough’s structure. Additionally, gentle handling is key. Once your dough is set, resist the urge to overwork it; a light touch is all you need to shape the rolls. Lastly, make sure your oven is preheated — nothing ruins a batch of no-knead dinner rolls faster than inconsistent heat!
With these tips, you’ll be well on your way to baking fluffy, irresistible rolls that everyone will rave about!
Time Breakdown for No-Knead Dinner Rolls
Getting homemade No-Knead Dinner Rolls on your table is a delightful experience, and understanding the timing can make it even smoother. Here’s a quick, friendly breakdown to help you plan your time effectively.
Preparation time
Getting started on these rolls takes just about 10 minutes. You’ll mix the simple ingredients (flour, water, yeast, and salt) and then let them begin their transformation.
Rising time
Patience is key! Allow the dough to rise for around 12 to 18 hours at room temperature. This overnight fermentation is what makes these rolls so wonderfully flavorful and soft.
Baking time
Once the dough has risen, preheat your oven and bake for about 25-30 minutes. You’ll know they’re ready when they turn a beautiful golden brown, filling your home with an irresistible aroma.
With this time breakdown, you can enjoy the process of making your No-Knead Dinner Rolls without feeling rushed. Happy baking!

Nutritional Information for No-Knead Dinner Rolls
Discovering the nutritional values of No-Knead Dinner Rolls opens up a world of delightful insights into what makes these rolls so special. Packed with simple ingredients, these rolls not only complement any meal but also provide a wholesome addition to your dinner table.
Calories
Each serving of these No-Knead Dinner Rolls contains approximately 150 calories. This makes them a suitable choice for those wanting to enjoy fresh bread without overindulging.
Protein
With a protein content of about 5 grams per roll, these goodies offer a modest but satisfying amount, helping to keep you fuller for longer and complementing a balanced diet.
Sodium
The sodium level in these No-Knead Dinner Rolls is relatively low, around 200 mg per roll. This is an important factor for those monitoring their salt intake while still enjoying homemade baked goods.
FAQs about No-Knead Dinner Rolls
No-knead dinner rolls bring the joy of baking to your kitchen without the fuss and muss of traditional bread-making, and they’re perfect for any occasion. If you have questions about making these fluffy delights, you’re in the right place!
Can I make these rolls ahead of time?
Absolutely! Preparing no-knead dinner rolls in advance is a total time-saver. After mixing the dough, you can let it rise in the fridge for up to 24 hours. When you’re ready to bake, simply take it out, let it come to room temperature for about an hour, and then proceed with shaping and baking. This way, you can have fresh, warm rolls ready right when you need them.
How do I store leftovers?
If you’re lucky enough to have any leftover no-knead dinner rolls, store them in an airtight container at room temperature for up to three days. If you want to keep them longer, consider freezing them. Just place the cooled rolls in a freezer-safe bag, and they’ll stay fresh for up to three months. When you’re ready to enjoy them again, just reheat in the oven at 350°F for about 10-15 minutes.
What if my yeast doesn’t foam?
If your yeast doesn’t foam when activated, it might be expired or the water temperature was too hot or too cold. The ideal water temperature is around 105°F to 115°F. To troubleshoot, try using fresh yeast, and always ensure your water is the right temperature. If everything checks out, you’ll be on your way to making delicious no-knead dinner rolls in no time!
Conclusion on No-Knead Dinner Rolls with Honey Butter
In the world of homemade bread, no-knead dinner rolls with honey butter stand out as a delightful experience for both the cook and the guests. After investing just a little time in preparing the dough, you’ll be greeted with soft, fluffy rolls that practically melt in your mouth. Pairing them with the sweet and creamy honey butter elevates the rolls to new heights, making them the star of any meal.
These rolls aren’t just easy to make; they also bring a sense of warmth and comfort to the table. Remember, whether it’s a holiday feast or a casual family dinner, these rolls will surely be a hit. So why not whip up a batch and create some lasting memories around the dinner table? Enjoy your baking journey!
Print
Honey Yeast Rolls
- Total Time: 2 hours 33 minutes
- Yield: 16 rolls 1x
- Diet: Vegetarian
Description
Deliciously soft and sweet honey yeast rolls, perfect for any meal.
Ingredients
Scale
- 7/8 cup water (scant 1 cup, warmed to about 125F for Platinum yeast, about 105 to 115F for most other yeast)
- 2 1/4 teaspoons instant or active dry yeast (one 1/4-ounce packet, I use Red Star Platinum)
- 2 large eggs
- 1/4 cup canola or vegetable oil
- 1/4 cup honey
- 1/2 teaspoon salt (or to taste)
- 3 1/2 cups all-purpose flour
- 1/4 cup unsalted butter, very soft
- 2 to 3 tablespoons honey
Instructions
- Pour water into a microwave-safe measuring cup or bowl and warm it to manufacturer’s directions on yeast packet, about 45 seconds on high power. Take the temperature with a thermometer. If you don’t have one, water should be warm to the touch, but not hot. Err on the side of too cool rather than too hot because you don’t want to kill the yeast.
- Pour water into a large mixing bowl and sprinkle the yeast over the top; wait 5 to 10 minutes, or until yeast is foamy. This means it’s alive and will work. (This is proofing and technically with instant dry yeast you don’t have to proof it, but for this recipe, I do).
- Add the eggs, oil, 1/4 cup honey, optional salt, and whisk to combine, about 30 seconds.
- Add the flour and stir with a wooden spoon to incorporate the flour. Stir for about 1 minute more. This is as much ‘kneading’ as the recipe requires. Dough will be thick, lumpy, bumpy, and not smooth. This is okay.
- Make a ball with the dough in the center of the bowl. Cover bowl with plastic wrap and place in a warm, draft-free place to rise until doubled in bulk, about 2 hours.
- At this point, you have two choices: bake the rolls now or bake them later.
- If you plan to bake now, punch dough down, remove it from bowl, and turn it out onto a well-floured surface.
- Knead it only so much as necessary to shape it into balls for rolls (I divide the dough in half, and if I’m making rolls, I make 8 rolls from each half, for 16 rolls total, they’re just a bit bigger than golf balls). Or form desired shapes such as mini loaves, challah, breadsticks, pretzels, etc. Use only what you need and save the rest for later in the refrigerator.
- Place balls of dough in a cooking sprayed round baking dish or pie plate, or in an 8×8 or 9×9 pan; size depends on how many you’re making. They can be close to each other, but if they’re overly squished they’ll bake into each other.
- Cover baking dish with plastic wrap, and allow rolls to rise in a warm, draft-free environment for about 1 hour, until almost doubled in size.
- In the final minutes of rising, preheat oven to 350F.
- Bake rolls for about 15 to 18 minutes, or until lightly golden and puffed. Baking time will vary greatly based on how many rolls you’re baking, or if it’s another shape such as a mini loaf, the size of the pan, and personal preference. Watch your bread, not the clock.
- Serve as soon as bread is cool enough to handle.
- If you plan to bake later, take dough that’s risen for about 2 hours from step 5, keep it covered, and refrigerate it. Dough may be kept refrigerated for up to 5 days before baking.
- When you plan to bake, pick up at step 5 and follow through the section labeled ‘if baking immediately.’
- Stir to combine the butter and honey. Generously brush or spread the mixture over the top of the dough before baking.
- Reserve remainder to serve with rolls after baking.
Notes
- Proofing yeast is optional but recommended for best results.
- Dough can be refrigerated for up to 5 days.
- Rolls can be shaped into different forms as desired.
- Prep Time: 15 minutes
- Cook Time: 18 minutes
- Category: Bread
- Method: Baking
- Cuisine: American
Nutrition
- Serving Size: 1 roll
- Calories: 150
- Sugar: 5g
- Sodium: 110mg
- Fat: 5g
- Saturated Fat: 1g
- Unsaturated Fat: 3g
- Trans Fat: 0g
- Carbohydrates: 23g
- Fiber: 1g
- Protein: 3g
- Cholesterol: 30mg